
阅读其他文章+源码阅读的个人总结
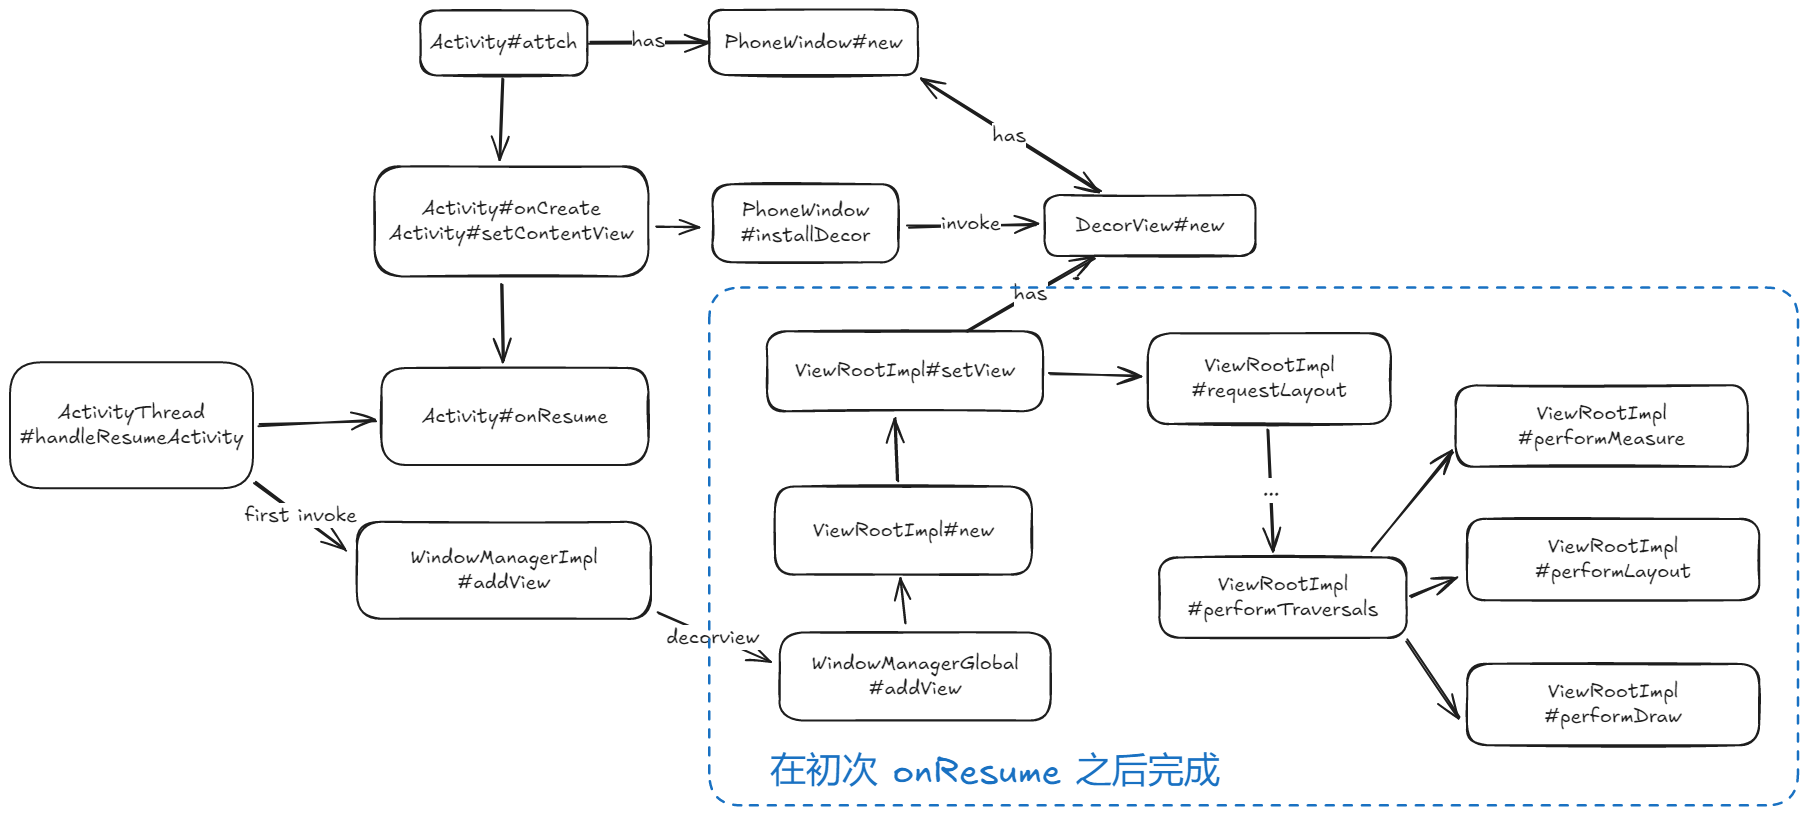
Activity 中需要通过 setContentView 来设置要显示的视图,视图通常是一整个 View 树,承载这颗 View 树的 DecorView 就需要将这颗树绘制出来,就需要经历 Measure、Layout、Draw 这三个阶段;
Activity 并不直接与 View 系统进行交互,而是用过 Window 和 View 系统进行交互;
Window 中使用 ViewRootImpl 和 DecorView 与 View 进行交互;
下面是基本的流程图:
Measure
Measure 是测量 View 尺寸大小的过程,只有知道了尺寸才能进行布局;
MeasureSpec
View 在 xml 中声明时需要带上自己的宽高属性,分为三种:wrap_content、match_parent 或指定值;
对于 match_parent 来说,需要知道父容器的尺寸才能知道自己的尺寸,如果父容器的宽是 100dp 那么该 View 的宽也是 100dp;
但是这个值可能来自于父容器的约束,也有可能来自于自身的约束,因此就需要使用 MeasureSpec 来区分这种区别;
MeasureSpec 类似一个工具类,负责计算并使用一个 int 类型(32位)来存储 View 的尺寸和 mode:
前两位表示 mode:
UNSPECIFIED、EXACTLY和AT_MOST后30位表示 size
public static class MeasureSpec {
	private static final int MODE_SHIFT = 30;
    public static final int UNSPECIFIED = 0 << MODE_SHIFT;
    public static final int EXACTLY     = 1 << MODE_SHIFT;
    public static final int AT_MOST     = 2 << MODE_SHIFT;

    public static int makeMeasureSpec(@IntRange(from = 0, to = (1 << MeasureSpec.MODE_SHIFT) - 1) int size, @MeasureSpecMode int mode) {
        // 下面两种方式相同,第二种位运算的效率更高一些
        if (sUseBrokenMakeMeasureSpec) {
            return size + mode;
        } else {
            return (size & ~MODE_MASK) | (mode & MODE_MASK);
        }
    }
}
三种测量模式:
LayoutParams
LayoutParams 是 ViewGroup 的一个静态内部类;
包含了最基础的两个属性:
width:对应布局文件中的layout_widthheight:对应布局文件中的layout_height
 public static class LayoutParams {
     @Deprecated
     public static final int FILL_PARENT = -1;
     public static final int MATCH_PARENT = -1;
     public static final int WRAP_CONTENT = -2;

     public int width;
     public int height;

     // 通过读取布局文件 `attrs` 来解析宽高
     public LayoutParams(Context c, AttributeSet attrs) {
         TypedArray a = c.obtainStyledAttributes(attrs, R.styleable.ViewGroup_Layout);
         setBaseAttributes(a,
                           R.styleable.ViewGroup_Layout_layout_width,
                           R.styleable.ViewGroup_Layout_layout_height);
         a.recycle();
     }
     // 外部直接指定宽高
     public LayoutParams(int width, int height) {
         this.width = width;
         this.height = height;
     }
 }
View 的 MeasureSpec 由 父容器的 MesureSpec(父容器尺寸)和 View 自身的 LayoutParams(自身尺寸)来共同决定:
View自身的尺寸需要受到父容器的尺寸影响,否则可能出现显示不全的问题(除非支持滚动)
ViewRootImpl & View
DecorView 是整个 View 树的根布局(继承于 FrameLayout),Activity 的 setContentView 就是向 DecorView 中执行 addView 操作;
既然是根布局,那么整个 View 树的测量过程需要从 DecorView 开始,从上到下从外到内进行;
DecorView 就是整个 View 树的最大可占据空间,其默认的宽高都是 match_parent 即占据整个屏幕空间;
ViewRootImpl 是整个 View 的顶层结构,但是并不是 View,作为 View 的管理者,是 WindowManagerGlobal 的委托者;
WindowManagerImpl -> WindowManagerGlobal -> ViewRootImpl
ViewRootImpl 的绘制流程入口是 requestLayout ,负责检查当前线程是否为UI线程,会调用到 scheduleTraversals:
向主线程 Handler 发送了一个异步 Message (开启了同步屏障)
该 Messgae 是一个 TraversalRunnable,最终会执行到
doTraversal
void scheduleTraversals() {
if (!mTraversalScheduled) {
mTraversalScheduled = true;
// 同步屏障,让视图更新的 Message 尽快执行
mTraversalBarrier = mHandler.getLooper().getQueue().postSyncBarrier();
// 发送一个视图更新的消息
mChoreographer.postCallback(
Choreographer.CALLBACK_TRAVERSAL, mTraversalRunnable, null);
notifyRendererOfFramePending();
pokeDrawLockIfNeeded();
}
}
// 上面发送的 mTraversalRunnable
final class TraversalRunnable implements Runnable {
@Override
public void run() {
doTraversal();
}
}doTraversal 会关闭主线程Handler消息队列的同步屏障,并执行 performTraversals,该方法就是真正开始 View 的绘制流程的方法:(省略大部分代码,仅查看流程)
private void performTraversals() {
// 想要 Window 的尺寸
int desiredWindowWidth;
int desiredWindowHeight;
if (mFirst) {
...
} else {
desiredWindowWidth = frame.width();
desiredWindowHeight = frame.height();
}
if (!mStopped || mReportNextDraw) {
if (mWidth != host.getMeasuredWidth() || mHeight != host.getMeasuredHeight()
|| dispatchApplyInsets || updatedConfiguration) {
int childWidthMeasureSpec = getRootMeasureSpec(mWidth, lp.width,
lp.privateFlags);
int childHeightMeasureSpec = getRootMeasureSpec(mHeight, lp.height,
lp.privateFlags);
// Ask host how big it wants to be
// 执行测量
performMeasure(childWidthMeasureSpec, childHeightMeasureSpec);
// 会对测量结果进行检查,如果存在问题会再次测量
if (measureAgain) {
performMeasure(childWidthMeasureSpec, childHeightMeasureSpec);
}
// 布局测量完毕
layoutRequested = true;
}
}
// 准备布局
final boolean didLayout = layoutRequested && (!mStopped || mReportNextDraw);
if (didLayout) {
performLayout(lp, mWidth, mHeight);
}
// 视图不可见
if (!isViewVisible) {
...
} else if (cancelAndRedraw) {
// 重绘
// Try again
scheduleTraversals();
} else {
// 执行绘制操作
if (!performDraw() && mActiveSurfaceSyncGroup != null) {
mActiveSurfaceSyncGroup.markSyncReady();
}
}
}其中关于测量的是:
 int childWidthMeasureSpec = getRootMeasureSpec(mWidth, lp.width,lp.privateFlags);
 int childHeightMeasureSpec = getRootMeasureSpec(mHeight, lp.height,lp.privateFlags);
 // 执行测量
 performMeasure(childWidthMeasureSpec, childHeightMeasureSpec);
其中 getRootMeasureSpec 是根据窗口的尺寸以及 LayoutParams 生成了对应的 MeasureSpec
 private static int getRootMeasureSpec(int windowSize, int measurement, int privateFlags) {
     int measureSpec;
     final int rootDimension = (privateFlags & PRIVATE_FLAG_LAYOUT_SIZE_EXTENDED_BY_CUTOUT) != 0
             ? MATCH_PARENT : measurement;
     switch (rootDimension) {
         case ViewGroup.LayoutParams.MATCH_PARENT:
             // Window can't resize. Force root view to be windowSize.
             measureSpec = MeasureSpec.makeMeasureSpec(windowSize, MeasureSpec.EXACTLY);
             break;
         case ViewGroup.LayoutParams.WRAP_CONTENT:
             // Window can resize. Set max size for root view.
             measureSpec = MeasureSpec.makeMeasureSpec(windowSize, MeasureSpec.AT_MOST);
             break;
         default:
             // Window wants to be an exact size. Force root view to be that size.
             measureSpec = MeasureSpec.makeMeasureSpec(rootDimension, MeasureSpec.EXACTLY);
             break;
     }
     return measureSpec;
 }
其中 performMesure 是开始测量的入口,其中 mView 是 DecorView,开始遍历整棵 View 树
 private void performMeasure(int childWidthMeasureSpec, int childHeightMeasureSpec) {
     if (mView == null) {
         return;
     }
     Trace.traceBegin(Trace.TRACE_TAG_VIEW, "measure");
     try {
         mView.measure(childWidthMeasureSpec, childHeightMeasureSpec);
     } finally {
         Trace.traceEnd(Trace.TRACE_TAG_VIEW);
     }
     mMeasuredWidth = mView.getMeasuredWidth();
     mMeasuredHeight = mView.getMeasuredHeight();
     mViewMeasureDeferred = false;
 }
View#measure 方法是 finla 修饰的方法,View 和 ViewGroup 的子类无法重写,该方法在执行完一些通用逻辑后,就会调用 onMeasure 方法;
onMeasure 方法就是进行自定义 View 的时候需要重写的方法之一,需要完成对 View 自身尺寸的测量(对于 ViewGroup 来说来需要测量所有子 View)
protected void onMeasure(int widthMeasureSpec, int heightMeasureSpec) {
setMeasuredDimension(getDefaultSize(getSuggestedMinimumWidth(), widthMeasureSpec),
getDefaultSize(getSuggestedMinimumHeight(), heightMeasureSpec));
}
protected int getSuggestedMinimumWidth() {
return (mBackground == null) ? mMinWidth : max(mMinWidth, mBackground.getMinimumWidth());
}
public static int getDefaultSize(int size, int measureSpec) {
int result = size;
int specMode = MeasureSpec.getMode(measureSpec);
int specSize = MeasureSpec.getSize(measureSpec);
switch (specMode) {
case MeasureSpec.UNSPECIFIED:
result = size;
break;
case MeasureSpec.AT_MOST:
case MeasureSpec.EXACTLY:
result = specSize;
break;
}
return result;
}测量完毕之后还需要将测量结果存储到自身,也就是调用 setMeasuredDimension 将测量结果传递过去;
注意:测量结果
measureWidth和mesaureHeight不一定等于最终的宽高,需要在 layout 阶段才能确定下来;因此平时获取测量的宽高(测量结果)不一定是最终的宽高;
protected final void setMeasuredDimension(int measuredWidth, int measuredHeight) {
boolean optical = isLayoutModeOptical(this);
if (optical != isLayoutModeOptical(mParent)) {
Insets insets = getOpticalInsets();
int opticalWidth = insets.left + insets.right;
int opticalHeight = insets.top + insets.bottom;
measuredWidth += optical ? opticalWidth : -opticalWidth;
measuredHeight += optical ? opticalHeight : -opticalHeight;
}
setMeasuredDimensionRaw(measuredWidth, measuredHeight);
}
private void setMeasuredDimensionRaw(int measuredWidth, int measuredHeight) {
mMeasuredWidth = measuredWidth;
mMeasuredHeight = measuredHeight;
mPrivateFlags |= PFLAG_MEASURED_DIMENSION_SET;
}ViewGroup
以 DecorView 为例,上面的 measure 开始测量的也是 DecorView,继承的 FrameLayout;
DecorView 增加了一些修正操作,当判断到 widthMode 和 heightMode 为 AT_MOST 时,就会尝试去将 mode 修正为 EXACTLY 并修改 size 大小,生成新的
widthMeasureSpec和heightMeasureSpec,并调用super.onMeasure将实际的测量操作交由 FrameLayout 去完成
 @Override
 protected void onMeasure(int widthMeasureSpec, int heightMeasureSpec) {
     final int widthMode = getMode(widthMeasureSpec);
     final int heightMode = getMode(heightMeasureSpec);
     boolean fixedWidth = false;
     mApplyFloatingHorizontalInsets = false;
     if (widthMode == AT_MOST) {
        // ...
     }
     mApplyFloatingVerticalInsets = false;
     if (heightMode == AT_MOST) {
         // ...
     }

     // 具体的测量工作交给 FrameLayout
     super.onMeasure(widthMeasureSpec, heightMeasureSpec);
     int width = getMeasuredWidth();
     boolean measure = false;
     widthMeasureSpec = MeasureSpec.makeMeasureSpec(width, EXACTLY);
     if (!fixedWidth && widthMode == AT_MOST) {
         // ...
     }
 }
继续看 FrameLayout 的 onMeasure 方法:
对于 FrameLayout 的布局特性来说,其尺寸肯定是最大的子View决定的;
除了这个外,还有 padding、minimumWidth、minimumHeight、foreground 等决定最终的测量尺寸大小;
如果 FrameLayout 设置定了约束值(
match_parent或精准值),就需要按照该约束来执行了;
大致的测量步骤:
对每个子View都测量得到其宽高,加上外边距,从中取最大值
maxHeight和maxWidth考虑了内边距 padding、最小尺寸 minimunXxx、前景drawable的最小尺寸
考虑特殊情况,在后面阐述
 @Override
 protected void onMeasure(int widthMeasureSpec, int heightMeasureSpec) {
     int count = getChildCount();
     // FrameLayout 的 layout_width 或 layout_height 是否设置了 wrap_content
     final boolean measureMatchParentChildren =
             MeasureSpec.getMode(widthMeasureSpec) != MeasureSpec.EXACTLY ||
             MeasureSpec.getMode(heightMeasureSpec) != MeasureSpec.EXACTLY;
     mMatchParentChildren.clear();

     int maxHeight = 0;
     int maxWidth = 0;
     int childState = 0;
     // 遍历所有子View
     for (int i = 0; i < count; i++) {
         final View child = getChildAt(i);
         // mMeasureAllChildren 默认为 false,不予理会
         // childView 只有不为 GONE 才需要 measure
         if (mMeasureAllChildren || child.getVisibility() != GONE) {
             // 完成 childView 的测量操作
             measureChildWithMargins(child, widthMeasureSpec, 0, heightMeasureSpec, 0);
             final LayoutParams lp = (LayoutParams) child.getLayoutParams(); // 取出测量结果
             // 取最大尺寸
             maxWidth = Math.max(maxWidth,
                     child.getMeasuredWidth() + lp.leftMargin + lp.rightMargin);
             maxHeight = Math.max(maxHeight,
                     child.getMeasuredHeight() + lp.topMargin + lp.bottomMargin);
             childState = combineMeasuredStates(childState, child.getMeasuredState());
             // 如果父容器是wrap_content,而子 View 是 match_parent,此时就需要确定最终大小
             // 用于后面逻辑
             if (measureMatchParentChildren) {
                 if (lp.width == LayoutParams.MATCH_PARENT ||
                         lp.height == LayoutParams.MATCH_PARENT) {
                     mMatchParentChildren.add(child);
                 }
             }
         }
     }
     // 考虑内边距以及 foreground 的内边距
     // Account for padding too
     maxWidth += getPaddingLeftWithForeground() + getPaddingRightWithForeground();
     maxHeight += getPaddingTopWithForeground() + getPaddingBottomWithForeground();
     // 考虑设置的最小尺寸
     // Check against our minimum height and width
     maxHeight = Math.max(maxHeight, getSuggestedMinimumHeight());
     maxWidth = Math.max(maxWidth, getSuggestedMinimumWidth());
     // 检查前景的最小尺寸
     // Check against our foreground's minimum height and width
     final Drawable drawable = getForeground();
     if (drawable != null) {
         maxHeight = Math.max(maxHeight, drawable.getMinimumHeight());
         maxWidth = Math.max(maxWidth, drawable.getMinimumWidth());
     }
     // 保存结果
     setMeasuredDimension(resolveSizeAndState(maxWidth, widthMeasureSpec, childState),
             resolveSizeAndState(maxHeight, heightMeasureSpec,
                     childState << MEASURED_HEIGHT_STATE_SHIFT));
     ...
 }
当父容器为 wrap_content,某个子 View 为 match_parent,对于 FrameLayout 来说大小不能直接确定(子View要父容器的大小,而父容器又要子View的大小)
因此需要先进行第一步的测量,得到父容器的测量结果之后,再以该测量结果去测量子 View,得到子View的测量结果;
第二步就是执行这样的测量;
 count = mMatchParentChildren.size();
 if (count > 1) {
     for (int i = 0; i < count; i++) {
         final View child = mMatchParentChildren.get(i);
         final MarginLayoutParams lp = (MarginLayoutParams) child.getLayoutParams();
         final int childWidthMeasureSpec;
         // 子 View 的宽度为 match_parent
         if (lp.width == LayoutParams.MATCH_PARENT) {
             final int width = Math.max(0, getMeasuredWidth()
                     - getPaddingLeftWithForeground() - getPaddingRightWithForeground()
                     - lp.leftMargin - lp.rightMargin);
             childWidthMeasureSpec = MeasureSpec.makeMeasureSpec(
                     width, MeasureSpec.EXACTLY);
         } else {
             childWidthMeasureSpec = getChildMeasureSpec(widthMeasureSpec,
                     getPaddingLeftWithForeground() + getPaddingRightWithForeground() +
                     lp.leftMargin + lp.rightMargin,
                     lp.width);
         }
         final int childHeightMeasureSpec;
         if (lp.height == LayoutParams.MATCH_PARENT) {
             final int height = Math.max(0, getMeasuredHeight()
                     - getPaddingTopWithForeground() - getPaddingBottomWithForeground()
                     - lp.topMargin - lp.bottomMargin);
             childHeightMeasureSpec = MeasureSpec.makeMeasureSpec(
                     height, MeasureSpec.EXACTLY);
         } else {
             childHeightMeasureSpec = getChildMeasureSpec(heightMeasureSpec,
                     getPaddingTopWithForeground() + getPaddingBottomWithForeground() +
                     lp.topMargin + lp.bottomMargin,
                     lp.height);
         }
         // 以给定值重新测量
         child.measure(childWidthMeasureSpec, childHeightMeasureSpec);
     }
 }
ParentMeasureSpec & LayoutParmas
对于 DecorView 来说,测量传入的 MeasureSpec 是通过测量屏幕宽高得到的;
对于子 View 来说,其 MeasureSpec 是父容器的 MeasureSpec 和 View 自己呃 LayoutParams 共同决定的;
父容器测量子View时并不关心其具体类型,只是负责下发测量要求并要求接受测量结果;
如果下一级是 ViewGroup, 则还需要继续分发下去先测量子View的大小;
如果下一级是 View,则自己完成测量即可;
此时需要是父容器的 MeasureSpec;
该方法是生成对子View 的父容器MeasureSpec,需要先减去父容器的 padding 才考虑容纳子 View 的大小:
spec 是父容器 MeasureSpec
padding 是某个方向上的内边距
childDimension 是子 View 的 LayoutParams
 public static int getChildMeasureSpec(int spec, int padding, int childDimension) {
     int specMode = MeasureSpec.getMode(spec);
     int specSize = MeasureSpec.getSize(spec);
     // 减去 padding
     int size = Math.max(0, specSize - padding);
     int resultSize = 0;
     int resultMode = 0;
     switch (specMode) {
     // 父容器已经固定了大小(不一定是父容器的总大小,而是某一块区域的大小)
     case MeasureSpec.EXACTLY:
         // 子 View 给了精确值
         if (childDimension >= 0) {
             // 子View给了精确值,如果大于size,则表现出来的是超出父容器
             resultSize = childDimension;
             resultMode = MeasureSpec.EXACTLY;
         } else if (childDimension == LayoutParams.MATCH_PARENT) {
             // 子View的宽度与父容器相当
             resultSize = size;
             resultMode = MeasureSpec.EXACTLY;
         } else if (childDimension == LayoutParams.WRAP_CONTENT) {
             // 子View根据自身内容决定尺寸,禁止超过父容器大小
             resultSize = size;
             resultMode = MeasureSpec.AT_MOST;
         }
         break;
     // 父容器为 wrap_content
     case MeasureSpec.AT_MOST:
         if (childDimension >= 0) {
             // Child wants a specific size... so be it
             resultSize = childDimension;
             resultMode = MeasureSpec.EXACTLY;
         } else if (childDimension == LayoutParams.MATCH_PARENT) {
             // Child wants to be our size, but our size is not fixed.
             // Constrain child to not be bigger than us.
             resultSize = size;
             resultMode = MeasureSpec.AT_MOST;
         } else if (childDimension == LayoutParams.WRAP_CONTENT) {
             // Child wants to determine its own size. It can't be
             // bigger than us.
             resultSize = size;
             resultMode = MeasureSpec.AT_MOST;
         }
         break;
     // 父容器对子View没有约束
     case MeasureSpec.UNSPECIFIED:
         if (childDimension >= 0) {
             // Child wants a specific size... let them have it
             resultSize = childDimension;
             resultMode = MeasureSpec.EXACTLY;
         } else if (childDimension == LayoutParams.MATCH_PARENT) {
             // Child wants to be our size... find out how big it should
             // be
             resultSize = View.sUseZeroUnspecifiedMeasureSpec ? 0 : size;
             resultMode = MeasureSpec.UNSPECIFIED;
         } else if (childDimension == LayoutParams.WRAP_CONTENT) {
             // Child wants to determine its own size.... find out how
             // big it should be
             resultSize = View.sUseZeroUnspecifiedMeasureSpec ? 0 : size;
             resultMode = MeasureSpec.UNSPECIFIED;
         }
         break;
     }
     //noinspection ResourceType
     return MeasureSpec.makeMeasureSpec(resultSize, resultMode);
 }
正常的测量子View:
 // ViewGroup
 protected void measureChild(View child, int parentWidthMeasureSpec,
         int parentHeightMeasureSpec) {
     final LayoutParams lp = child.getLayoutParams();
     final int childWidthMeasureSpec = getChildMeasureSpec(parentWidthMeasureSpec,
             mPaddingLeft + mPaddingRight, lp.width);
     final int childHeightMeasureSpec = getChildMeasureSpec(parentHeightMeasureSpec,
             mPaddingTop + mPaddingBottom, lp.height);
     child.measure(childWidthMeasureSpec, childHeightMeasureSpec);
 }
Layout
Layout 阶段就是View确定自己在屏幕上的位置
ViewRootImpl
Layout 开始的位置也是 ViewRootImpl 的 performTraversals 中执行完 performMeasure 开始的;
 // ViewRootImpl
 private void performTraversals() {
     ...
     if (didLayout) {
         // mWidth 和 mHeight 是测量过程中得到的屏幕宽高
         performLayout(lp, mWidth, mHeight);
         ...
     }
     ...
 }
performLayout 调用 DecorView 的 layout 方法,开始整颗 View 树的布局操作
// ViewRootImpl
private void performLayout(WindowManager.LayoutParams lp, int desiredWindowWidth,
int desiredWindowHeight) {
mScrollMayChange = true;
mInLayout = true;
final View host = mView; // DecorView
if (host == null) {
return;
}
try {
// 调用 DecorView 的 layout
host.layout(0, 0, host.getMeasuredWidth(), host.getMeasuredHeight());
mInLayout = false;
...
} finally {
...
}
mInLayout = false;
}DecorView & ViewGroup
DecorView 并没有重写 layout 方法,最终调用到的是 ViewGroup 的(FrameLayout 也没有重写)layout 方法
只是对一些情况进行判断处理,最后还是调用其父类 View 的 layout 方法
 // ViewGroup
 @Override
 public final void layout(int l, int t, int r, int b) {
     if (!mSuppressLayout && (mTransition == null || !mTransition.isChangingLayout())) {
         if (mTransition != null) {
             mTransition.layoutChange(this);
         }
         super.layout(l, t, r, b);
     } else {
         // record the fact that we noop'd it; request layout when transition finishes
         mLayoutCalledWhileSuppressed = true;
     }
 }
View
View 通过 left、top、right、bottom 来标识自己在父容器中的位置(相对于父容器的坐标值);
setFrame是layout传入的值赋值给 View 的四个值至此 View 的宽高才真正确定下来,因为
getWidth()和getHeight是根据这四个值进行减法运算得到的;
其中会调用 onLayout:在View中是一个空实现,但是在 ViewGroup 就是用来布局其子View的;
public void layout(int l, int t, int r, int b) {
...
boolean changed = isLayoutModeOptical(mParent) ?
setOpticalFrame(l, t, r, b) : setFrame(l, t, r, b);
if (changed || (mPrivateFlags & PFLAG_LAYOUT_REQUIRED) == PFLAG_LAYOUT_REQUIRED) {
...
// 调用 onLayout
onLayout(changed, l, t, r, b);
...
if (li != null && li.mOnLayoutChangeListeners != null) {
ArrayList<OnLayoutChangeListener> listenersCopy =
(ArrayList<OnLayoutChangeListener>)li.mOnLayoutChangeListeners.clone();
int numListeners = listenersCopy.size();
for (int i = 0; i < numListeners; ++i) {
listenersCopy.get(i).onLayoutChange(this, l, t, r, b, oldL, oldT, oldR, oldB);
}
}
}
...
}
protected void onLayout(boolean changed, int left, int top, int right, int bottom) {
}setFrame:将新的四个值分别赋值给View的对应字段,如果宽高发生变化,还会回调 sizeChange 方法;
 protected boolean setFrame(int left, int top, int right, int bottom) {
     boolean changed = false;
     ...
     if (mLeft != left || mRight != right || mTop != top || mBottom != bottom) {
         changed = true;
         // Remember our drawn bit
         int drawn = mPrivateFlags & PFLAG_DRAWN;
         int oldWidth = mRight - mLeft;
         int oldHeight = mBottom - mTop;
         int newWidth = right - left;
         int newHeight = bottom - top;
         boolean sizeChanged = (newWidth != oldWidth) || (newHeight != oldHeight);
         // Invalidate our old position
         invalidate(sizeChanged);
         mLeft = left;
         mTop = top;
         mRight = right;
         mBottom = bottom;
         mRenderNode.setLeftTopRightBottom(mLeft, mTop, mRight, mBottom);
         mPrivateFlags |= PFLAG_HAS_BOUNDS;
         if (sizeChanged) {
             sizeChange(newWidth, newHeight, oldWidth, oldHeight);
         }
         ...
     }
     return changed;
 }
ViewGroup#onLayout
大部分的 View 都不需要重写 onLayout 空实现;
但是 ViewGroup 将该方法变成抽象方法,规定其子类必须实现该方法来管理子View的摆放位置;
FrameLayout 和 LinearLayout 等容器都会通过该方法来实现不同的布局效果;
以 FrameLayout 为例:
子View主要使用
layout_gravity和layout_margin声明自己的位置;除此之外,FrameLayout 自身的 padding 也会影响到子View的布局位置;
因此计算子View的位置时,需要考虑上面的因素并根据不同的情况计算出对应的 left、top、right、bottom
@Override
protected void onLayout(boolean changed, int left, int top, int right, int bottom) {
    layoutChildren(left, top, right, bottom, false /* no force left gravity */);
}

void layoutChildren(int left, int top, int right, int bottom, boolean forceLeftGravity) {
    final int count = getChildCount();
    final int parentLeft = getPaddingLeftWithForeground();
    final int parentRight = right - left - getPaddingRightWithForeground();
    final int parentTop = getPaddingTopWithForeground();
    final int parentBottom = bottom - top - getPaddingBottomWithForeground();
    for (int i = 0; i < count; i++) {
        final View child = getChildAt(i);
        if (child.getVisibility() != GONE) {
            final LayoutParams lp = (LayoutParams) child.getLayoutParams();
            final int width = child.getMeasuredWidth();
            final int height = child.getMeasuredHeight();
            int childLeft;
            int childTop;
            int gravity = lp.gravity;
            if (gravity == -1) {
                gravity = DEFAULT_CHILD_GRAVITY;
            }
            final int layoutDirection = getLayoutDirection();
            final int absoluteGravity = Gravity.getAbsoluteGravity(gravity, layoutDirection);
            final int verticalGravity = gravity & Gravity.VERTICAL_GRAVITY_MASK;

            // 考虑水平方向上的约束条件
            switch (absoluteGravity & Gravity.HORIZONTAL_GRAVITY_MASK) {
                    // 水平居中
                case Gravity.CENTER_HORIZONTAL:
                    childLeft = parentLeft + (parentRight - parentLeft - width) / 2 +
                    lp.leftMargin - lp.rightMargin;
                    break;
                    // 靠右
                case Gravity.RIGHT:
                    if (!forceLeftGravity) {
                        childLeft = parentRight - width - lp.rightMargin;
                        break;
                    }
                    // 靠左
                case Gravity.LEFT:
                default:
                    childLeft = parentLeft + lp.leftMargin;
            }
            // 考虑垂直方向上的约束条件
            switch (verticalGravity) {
                    // 靠顶部
                case Gravity.TOP:
                    childTop = parentTop + lp.topMargin;
                    break;
                    // 竖直居中
                case Gravity.CENTER_VERTICAL:
                    childTop = parentTop + (parentBottom - parentTop - height) / 2 +
                    lp.topMargin - lp.bottomMargin;
                    break;
                    // 靠底部
                case Gravity.BOTTOM:
                    childTop = parentBottom - height - lp.bottomMargin;
                    break;
                default:
                    childTop = parentTop + lp.topMargin;
            }
            child.layout(childLeft, childTop, childLeft + width, childTop + height);
        }
    }
}
Draw
绘制阶段:将整颗View树需要呈现出来的内容 “画” 到一块 Canvas 上;
ViewRootImpl 执行 performDraw,接着调用 draw 方法拿到 Surface,接着调用 drawSoft,从 Surface 中取得 Canvas后,调用 DecorView 的 draw 方法;
draw
View的 draw 方法是 final,无法重写,负责一些固定逻辑:
@CallSuper
public void draw(@NonNull Canvas canvas) {
	...
    /*
     * Draw traversal performs several drawing steps which must be executed
     * in the appropriate order:
     *
     *      1. Draw the background
     *      2. If necessary, save the canvas' layers to prepare for fading
     *      3. Draw view's content
     *      4. Draw children
     *      5. If necessary, draw the fading edges and restore layers
     *      6. Draw decorations (scrollbars for instance)
     *      7. If necessary, draw the default focus highlight
     */
    // Step 1, draw the background, if needed
    int saveCount;
    drawBackground(canvas);
    // skip step 2 & 5 if possible (common case)
    final int viewFlags = mViewFlags;
    boolean horizontalEdges = (viewFlags & FADING_EDGE_HORIZONTAL) != 0;
    boolean verticalEdges = (viewFlags & FADING_EDGE_VERTICAL) != 0;
    if (!verticalEdges && !horizontalEdges) {
        // Step 3, draw the content
        onDraw(canvas);
        // Step 4, draw the children
        dispatchDraw(canvas);
        drawAutofilledHighlight(canvas);
        // Overlay is part of the content and draws beneath Foreground
        if (mOverlay != null && !mOverlay.isEmpty()) {
            mOverlay.getOverlayView().dispatchDraw(canvas);
        }
        // Step 6, draw decorations (foreground, scrollbars)
        onDrawForeground(canvas);
        // Step 7, draw the default focus highlight
        drawDefaultFocusHighlight(canvas);
        if (isShowingLayoutBounds()) {
            debugDrawFocus(canvas);
        }
        // we're done...
        return;
    }
  	....
}
绘制背景
drawBackground:private void drawBackground(@NonNull Canvas canvas) { final Drawable background = mBackground; if (background == null) { return; } setBackgroundBounds(); ... final int scrollX = mScrollX; final int scrollY = mScrollY; if ((scrollX | scrollY) == 0) { background.draw(canvas); } else { canvas.translate(scrollX, scrollY); background.draw(canvas); canvas.translate(-scrollX, -scrollY); } }保存当前图层信息(通常可以跳过)
绘制自身内容
onDraw,该方法是空实现,自定义View需要实现该方法;protected void onDraw(@NonNull Canvas canvas) { }绘制子View的内容
dispatchDraw,自定义ViewGroup需要实现该方法来绘制子View的内容protected void dispatchDraw(@NonNull Canvas canvas) { }绘制View的褪色边缘,类似于阴影效果。(可跳过)
绘制前景
onDrawForeground,比如滚动条等装饰;public void onDrawForeground(@NonNull Canvas canvas) { onDrawScrollIndicators(canvas); onDrawScrollBars(canvas); final Drawable foreground = mForegroundInfo != null ? mForegroundInfo.mDrawable : null; if (foreground != null) { if (mForegroundInfo.mBoundsChanged) { mForegroundInfo.mBoundsChanged = false; final Rect selfBounds = mForegroundInfo.mSelfBounds; final Rect overlayBounds = mForegroundInfo.mOverlayBounds; if (mForegroundInfo.mInsidePadding) { selfBounds.set(0, 0, getWidth(), getHeight()); } else { selfBounds.set(getPaddingLeft(), getPaddingTop(), getWidth() - getPaddingRight(), getHeight() - getPaddingBottom()); } final int ld = getLayoutDirection(); Gravity.apply(mForegroundInfo.mGravity, foreground.getIntrinsicWidth(), foreground.getIntrinsicHeight(), selfBounds, overlayBounds, ld); foreground.setBounds(overlayBounds); } foreground.draw(canvas); } }绘制默认的焦点高亮
drawDefaultFocusHighlightprivate void drawDefaultFocusHighlight(@NonNull Canvas canvas) { if (mDefaultFocusHighlight != null && isFocused()) { if (mDefaultFocusHighlightSizeChanged) { mDefaultFocusHighlightSizeChanged = false; final int l = mScrollX; final int r = l + mRight - mLeft; final int t = mScrollY; final int b = t + mBottom - mTop; mDefaultFocusHighlight.setBounds(l, t, r, b); } mDefaultFocusHighlight.draw(canvas); } }
相关方法
View#requestLayout
除了 ViewRootImpl 通过该方法来触发View树的测量、布局、绘制外,还有 View、ViewGroup 也提供了该方法:
当View自己需要重新布局时,其父容器也是需要重新布局的,通过
mParent层层向上传递,最终到达 DecorViewDecorView 在被
ViewRootImpl#setView时,会设置其mParent为 ViewRootImpl,因此最终调用的是ViewRootImpl#requestLayout
 // View
 public void requestLayout() {
     ...
     // 设置强制布局的标记位
     mPrivateFlags |= PFLAG_FORCE_LAYOUT;
     mPrivateFlags |= PFLAG_INVALIDATED;
     if (mParent != null && !mParent.isLayoutRequested()) {
         mParent.requestLayout();
     }
     if (mAttachInfo != null && mAttachInfo.mViewRequestingLayout == this) {
         mAttachInfo.mViewRequestingLayout = null;
     }
 }
在 ViewRootImpl#setView 中会给 DecorView 赋值 mParent:
// ViewRootImpl
public void setView(View view, WindowManager.LayoutParams attrs, View panelParentView,
int userId) {
...
view.assignParent(this);
...
}
// View
void assignParent(ViewParent parent) {
if (mParent == null) {
mParent = parent;
} else if (parent == null) {
mParent = null;
} else {
throw new RuntimeException("view " + this + " being added, but"
+ " it already has a parent");
}
}
为了避免整颗 View 树的重绘,会给调用 requestLayout 的View及其所有父容器都会设置 PFLAG_FORCE_LAYOUT 和 PFLAG_INVALIDATED 标记位,判断是否需要执行测量、布局流程;
对于 measure 方法:forceLayout 为 true 才会执行测量,在测量结束后还会设置 PFLAG_LAYOUT_REQUIRED 标志位
 public final void measure(int widthMeasureSpec, int heightMeasureSpec) {
     ···
     final boolean forceLayout = (mPrivateFlags & PFLAG_FORCE_LAYOUT) == PFLAG_FORCE_LAYOUT;
     ···
     if (forceLayout || needsLayout) {
         ···
         onMeasure(widthMeasureSpec, heightMeasureSpec);
         ···
         mPrivateFlags |= PFLAG_LAYOUT_REQUIRED;
     }
     ···
 }
对于 layout 方法:会判断 PFLAG_LAYOUT_REQUIRED 标志位,上面测量设置过后,这里就会执行布局流程;
public void layout(int l, int t, int r, int b) {
···
boolean changed = isLayoutModeOptical(mParent) ?
setOpticalFrame(l, t, r, b) : setFrame(l, t, r, b);
if (changed || (mPrivateFlags & PFLAG_LAYOUT_REQUIRED) == PFLAG_LAYOUT_REQUIRED) {
onLayout(changed, l, t, r, b);
···
}
···
}
对于 ViewRootImpl#draw 执行绘制流程的条件:
只有
ViewRootImpl#invalidate方法调用才会给dirty设置值;在布局过程中,如果某个View的尺寸发生改变,其
setFrame方法会调用invalidate,导致dirty不为空;对于尺寸没有变化的 View树,
dirty.isEmpty()返回的是 true,因此不会进行绘制操作
 if (!dirty.isEmpty() || mIsAnimating || accessibilityFocusDirty) {
     // draw
 }
总结
调用了 reuqestLayout 方法会触发 ViewRootImpl#performTraversals 方法,依次执行 performMeasure、performLayout 和 performDraw 流程;
调用者 View 及其父容器都会重新进行 measure 和 layout,不一定会重新绘制;
不是整颗 View 树都会被重新测量、布局、绘制,对于调用者 View 以及父容器会重新测量和布局,如果尺寸发生改变会触发重新绘制;
因此为了确保重绘操作执行,通常会在后面加上 invalidate
View#invalidate
用于让整个 View 失效,在某个时间点会重新调用其 onDraw;
需要在主线程调用,如果在子线程则需更换为
postInvalidate方法使用
skipInvalidate判断当前视图是否为可见,如果不可见同时没有动画执行,则跳过绘制;判断当前 View 的标志位是否需要重绘,如果需要则设置重绘相关的标志位
通过父容器的
invalidateChild将重绘事件传递给父容器;
public void invalidate() {
invalidate(true);
}
public void invalidate(boolean invalidateCache) {
invalidateInternal(0, 0, mRight - mLeft, mBottom - mTop, invalidateCache, true);
}
void invalidateInternal(int l, int t, int r, int b, boolean invalidateCache,
boolean fullInvalidate) {
if (mGhostView != null) {
mGhostView.invalidate(true);
return;
}
// 跳过不可见的View绘制
if (skipInvalidate()) {
return;
}
// Reset content capture caches
// 标志位设置
mPrivateFlags4 &= ~PFLAG4_CONTENT_CAPTURE_IMPORTANCE_MASK;
mContentCaptureSessionCached = false;
if ((mPrivateFlags & (PFLAG_DRAWN | PFLAG_HAS_BOUNDS)) == (PFLAG_DRAWN | PFLAG_HAS_BOUNDS)
|| (invalidateCache && (mPrivateFlags & PFLAG_DRAWING_CACHE_VALID) == PFLAG_DRAWING_CACHE_VALID)
|| (mPrivateFlags & PFLAG_INVALIDATED) != PFLAG_INVALIDATED
|| (fullInvalidate && isOpaque() != mLastIsOpaque)) {
if (fullInvalidate) {
mLastIsOpaque = isOpaque();
mPrivateFlags &= ~PFLAG_DRAWN;
}
mPrivateFlags |= PFLAG_DIRTY;
if (invalidateCache) {
mPrivateFlags |= PFLAG_INVALIDATED;
mPrivateFlags &= ~PFLAG_DRAWING_CACHE_VALID;
}
// Propagate the damage rectangle to the parent view.
// 将重绘事件传递给父容器
final AttachInfo ai = mAttachInfo;
final ViewParent p = mParent;
if (p != null && ai != null && l < r && t < b) {
final Rect damage = ai.mTmpInvalRect;
damage.set(l, t, r, b);
p.invalidateChild(this, damage);
}
// Damage the entire projection receiver, if necessary.
if (mBackground != null && mBackground.isProjected()) {
final View receiver = getProjectionReceiver();
if (receiver != null) {
receiver.damageInParent();
}
}
}
}未开启硬件加速
未开启硬件加速会走到后面部分逻辑:
ViewGroup 的 invalidateChild 方法:
通过循环不断层层向上传递重绘事件
invalidateChildInParent,每次传递都会计算需要重绘的区间并集dirty;直到到达 DecorView,然后再到 ViewRootImpl 方法,最终调用到
invalidateRectOnScreen
 // ViewGroup
 public final void invalidateChild(View child, final Rect dirty) {
     final AttachInfo attachInfo = mAttachInfo;
     if (attachInfo != null && attachInfo.mHardwareAccelerated) {
         // HW accelerated fast path
         onDescendantInvalidated(child, child);
         return;
     }
     ViewParent parent = this;
     if (attachInfo != null) {
         ...
         do {
             View view = null;
             if (parent instanceof View) {
                 view = (View) parent;
             }
             ...
             parent = parent.invalidateChildInParent(location, dirty);
             ...
         } while (parent != null);
     }
 }
ViewRootImpl的 invalidateRectOnScreen 最终会调用 scheduleTraversals
 // ViewRootImpl
 private void invalidateRectOnScreen(Rect dirty) {
     if (DEBUG_DRAW) Log.v(mTag, "invalidateRectOnScreen: " + dirty);
     final Rect localDirty = mDirty;
     // Add the new dirty rect to the current one
     localDirty.union(dirty.left, dirty.top, dirty.right, dirty.bottom);
     // Intersect with the bounds of the window to skip
     // updates that lie outside of the visible region
     final float appScale = mAttachInfo.mApplicationScale;
     final boolean intersected = localDirty.intersect(0, 0,
             (int) (mWidth * appScale + 0.5f), (int) (mHeight * appScale + 0.5f));
     if (!intersected) {
         localDirty.setEmpty();
     }
     if (!mWillDrawSoon && (intersected || mIsAnimating)) {
         scheduleTraversals();
     }
 }
在 ViewRootImpl#performTraversals 中:
ViewRootImpl#requestLayout会设置标志位mLayoutRequested = true;,该标志位会影响测量和布局的触发;而
invalidate并不会设置该标志位,因此不会触发对应的测量和布局过程,而是直接走绘制过程;
触发测量
performMeasure的条件:// layoutRequested 和 mLayoutRequested 相同 boolean layoutRequested = mLayoutRequested && (!mStopped || mReportNextDraw); if (layoutRequested) { if (!mFirst) { if (lp.width == ViewGroup.LayoutParams.WRAP_CONTENT || lp.height == ViewGroup.LayoutParams.WRAP_CONTENT) { // 注意该字段,被设为true,导致下面的测量过程条件满足 windowSizeMayChange = true; } } } boolean windowShouldResize = layoutRequested && windowSizeMayChange && ((mWidth != host.getMeasuredWidth() || mHeight != host.getMeasuredHeight()) || (lp.width == ViewGroup.LayoutParams.WRAP_CONTENT && frame.width() < desiredWindowWidth && frame.width() != mWidth) || (lp.height == ViewGroup.LayoutParams.WRAP_CONTENT && frame.height() < desiredWindowHeight && frame.height() != mHeight)); if (mFirst || windowShouldResize || viewVisibilityChanged || params != null || mForceNextWindowRelayout) { }触发布局
performLayout的条件:final boolean didLayout = layoutRequested && (!mStopped || mReportNextDraw);
对于 postInvalidate 实际上是往 ViewRootImpl 的 ViewRootHandler 发送了一个消息
public void postInvalidateDelayed(long delayMilliseconds) {
    final AttachInfo attachInfo = mAttachInfo;
    if (attachInfo != null) {
        attachInfo.mViewRootImpl.dispatchInvalidateDelayed(this, delayMilliseconds);
    }
}

public void dispatchInvalidateDelayed(View view, long delayMilliseconds) {
    Message msg = mHandler.obtainMessage(MSG_INVALIDATE, view);
    mHandler.sendMessageDelayed(msg, delayMilliseconds);
}

private void handleMessageImpl(Message msg) {
    switch (msg.what) {
        case MSG_INVALIDATE:
            ((View) msg.obj).invalidate();
            break;
    }
}
其他的流程和 invaldate 一样;
开启硬件加速
如果开启了硬件加速,invalidate 的流程会有所不同,调用 invalidate 的 View 将事件传到 ViewGroup 会进行硬件加速的判断;
// ViewGroup
public final void invalidateChild(View child, final Rect dirty) {
final AttachInfo attachInfo = mAttachInfo;
if (attachInfo != null && attachInfo.mHardwareAccelerated) {
// HW accelerated fast path
onDescendantInvalidated(child, child);
return;
}
...
}调用了硬件加速相关的 onDescendantInvalidated,相同的一样会不断向上传递直到 ViewRootImpl#onDescendantInvalidated
 // ViewGroup
 @CallSuper
 public void onDescendantInvalidated(@NonNull View child, @NonNull View target) {
     ...
     if ((target.mPrivateFlags & ~PFLAG_DIRTY_MASK) != 0) {
         mPrivateFlags = (mPrivateFlags & ~PFLAG_DIRTY_MASK) | PFLAG_DIRTY;
         // 这里将 PFLAG_DRAWING_CACHE_VALID 标志位置0,记住这里,后面有用到
         mPrivateFlags &= ~PFLAG_DRAWING_CACHE_VALID;
     }
     if (mParent != null) {
         mParent.onDescendantInvalidated(this, target);
     }
 }
需要注意的是,调用了 invalidate 的 View 会设置 PFLAG_INVALIDATED 标志位,而向上传递到达的 View 并不会设置改标志位
ViewRootImpl 的 onDescendantInvalidated 最终也会调用到 performTraversals:
// ViewRootImpl
public void onDescendantInvalidated(@NonNull View child, @NonNull View descendant) {
// TODO: Re-enable after camera is fixed or consider targetSdk checking this
// checkThread();
if ((descendant.mPrivateFlags & PFLAG_DRAW_ANIMATION) != 0) {
mIsAnimating = true;
}
invalidate();
}
void invalidate() {
mDirty.set(0, 0, mWidth, mHeight);
if (!mWillDrawSoon) {
scheduleTraversals();
}
}但是开启了硬件加速的绘制流程并不会走 drawSoft,而是走 ThreadedRenderer#draw:(View参数是DecorView)
// ThreadedRenderer
void draw(View view, AttachInfo attachInfo, DrawCallbacks callbacks) {
...
updateRootDisplayList(view, callbacks);
...
}
private void updateRootDisplayList(View view, DrawCallbacks callbacks) {
...
updateViewTreeDisplayList(view);
...
}
private void updateViewTreeDisplayList(View view) {
view.mPrivateFlags |= View.PFLAG_DRAWN;
// 在调用 invalidate 的View 和顶部View之间所有View都是false
view.mRecreateDisplayList = (view.mPrivateFlags & View.PFLAG_INVALIDATED)
== View.PFLAG_INVALIDATED;
view.mPrivateFlags &= ~View.PFLAG_INVALIDATED;
view.updateDisplayListIfDirty();
view.mRecreateDisplayList = false;
}
继续跟进 View#updateDisplayListIfDirty:
第一个if分支的
mPrivateFlags & PFLAG_DRAWING_CACHE_VALID) == 0是成立的,因为onDescendantInvalidated调用过程中会将该标志位设置为0进入第一个if分支后的条件也是成立的:
hasDisplayList是判断 renderNode 是否有效,在首次绘制会返回true;mRecreateDisplayList是没有设置PFLAG_INVALIDATED标志位时为 false,即不需要重新创建 DisplayList
因此会进入
dispatchGetDisplayList方法,继续查找对应的子View,而不会走后面的重绘逻辑
 // View
 public RenderNode updateDisplayListIfDirty() {
     final RenderNode renderNode = mRenderNode;
     ...
     // 会进入该分支
     if ((mPrivateFlags & PFLAG_DRAWING_CACHE_VALID) == 0
             || !renderNode.hasDisplayList()
             || (mRecreateDisplayList)) {

         // hasDisplayList 是判断renderNode 是否有效,在首次绘制会返回true
         // 调用这个: nIsValid(mNativeRenderNode);
         if (renderNode.hasDisplayList()
                 && !mRecreateDisplayList) {
             mPrivateFlags |= PFLAG_DRAWN | PFLAG_DRAWING_CACHE_VALID;
             mPrivateFlags &= ~PFLAG_DIRTY_MASK;
             dispatchGetDisplayList();
             return renderNode; // no work needed
         }
         ...
     return renderNode;
 }
View#dispatchGetDisplayList 是空实现,实现了该方法的是 ViewGroup:
会遍历其所有的子View,对于可见或执行动画的子View会调用
recreateChildDisplayList会重新调用到
View#updateDisplayListIfDirty,这是一个递归过程,遍历当前所有子 View
// ViewGroup
protected void dispatchGetDisplayList() {
final int count = mChildrenCount;
final View[] children = mChildren;
for (int i = 0; i < count; i++) {
final View child = children[i];
if (((child.mViewFlags & VISIBILITY_MASK) == VISIBLE || child.getAnimation() != null)) {
recreateChildDisplayList(child);
}
}
....
}
private void recreateChildDisplayList(View child) {
// 设置了 PFLAG_INVALIDATED 会为 true
child.mRecreateDisplayList = (child.mPrivateFlags & PFLAG_INVALIDATED) != 0;
child.mPrivateFlags &= ~PFLAG_INVALIDATED;
child.updateDisplayListIfDirty();
child.mRecreateDisplayList = false;
}对于设置了 PFLAG_INVALIDATED 标志位的 View,其 mRecreateDisplayList 为 true,因此在 View#updateDisplayListIfDirty 方法中会执行后续的重绘逻辑,该重绘会执行到 draw 方法:
对于 View 来说,只会重绘本身;
对于 ViewGroup 来说,还会调用
dispatchDraw绘制其所有View
不管怎么样,还是会遍历完整颗 View 树,只是针对调用了 invalidate 的View 进行重绘罢了;
不过对比关闭硬件加速的
drawSoft会重绘整颗 View 树,硬件加速的的重绘效率会高上许多
总结
对于未开启硬件加速的 invalidate,走的是 drawSoft ,会重绘整颗 View 树;
对于开启硬件加速的 invalidate,虽然也会触发 ViewRootImpl#performTraversals ,但走的是 ThreadedRendered 的重绘,会遍历整颗 View 树,找到设置了标志位 PFLAG_INVALIDATED 的子View,对该View执行重绘操作,而不会绘制其他View;
相关问题
LayoutInflater:LayoutParams在什么时候生成?
xml声明布局的属性是怎么转换为 LayoutParams 以及对应 View 对象呢?
在 DecorView 生成内部布局时,使用过 LayoutInflater 执行的:
void onResourcesLoaded(LayoutInflater inflater, int layoutResource) {
    ...
    final View root = inflater.inflate(layoutResource, null);
    ...
}
内部会调用该方法:
首先会尝试从预编译类加载资源(略过)
拿到一个可以读取指定布局文件的
XmlResourceParser通过
inflate方法将xml的布局文件转化为 View 树
 // LayoutInflater
 public View inflate(@LayoutRes int resource, @Nullable ViewGroup root, boolean attachToRoot) {
     final Resources res = getContext().getResources();
     ...
     // 尝试从预编译的资源中加载
     View view = tryInflatePrecompiled(resource, res, root, attachToRoot);
     if (view != null) {
         return view;
     }
     XmlResourceParser parser = res.getLayout(resource);
     try {
         return inflate(parser, root, attachToRoot);
     } finally {
         parser.close();
     }
 }
inflater 的方法大致可以总结为:
通过
createView反射 或LayoutInflater.Factory创建对应的View对象
通过
rInflateChildren递归生成嵌套的子View对象
 // LayoutInflater
 public View inflate(XmlPullParser parser, @Nullable ViewGroup root, boolean attachToRoot) {
     synchronized (mConstructorArgs) {
         // xml 声明的属性
         final AttributeSet attrs = Xml.asAttributeSet(parser);
         View result = root;
         ...
         try {
             // 移动到根节点部分
             advanceToRootNode(parser);
             final String name = parser.getName();
             // 根节点是 merge 标签
             if (TAG_MERGE.equals(name)) {
                 if (root == null || !attachToRoot) {
                     throw new InflateException("<merge /> can be used only with a valid "
                             + "ViewGroup root and attachToRoot=true");
                 }
                 rInflate(parser, root, inflaterContext, attrs, false);
             } else {
                 // 根节点对应的View
                 final View temp = createViewFromTag(root, name, inflaterContext, attrs);
                 ...
                 ViewGroup.LayoutParams params = null;
                 if (root != null) {

                     // 根据当前 temp 生成对应的 LayoutParams
                     params = root.generateLayoutParams(attrs);
                     if (!attachToRoot) {
                         // 添加到 root 是使用 addView
                         // 这里不用添加到 root
                         temp.setLayoutParams(params);
                     }
                 }
                 // 递归创建其所有的子View
                 rInflateChildren(parser, temp, attrs, true);

                 // 添加到 root
                 if (root != null && attachToRoot) {
                     root.addView(temp, params);
                 }
                 // Decide whether to return the root that was passed in or the
                 // top view found in xml.
                 if (root == null || !attachToRoot) {
                     result = temp;
                 }
             }
         }
         return result;
     }
 }
rInflate
 // LayoutInflater
 void rInflate(XmlPullParser parser, View parent, Context context,
         AttributeSet attrs, boolean finishInflate) throws XmlPullParserException, IOException {
     final int depth = parser.getDepth();
     int type;
     boolean pendingRequestFocus = false;
     // 相同层级的子View添加到 parent 中
     while (((type = parser.next()) != XmlPullParser.END_TAG ||
             parser.getDepth() > depth) && type != XmlPullParser.END_DOCUMENT) {
         if (type != XmlPullParser.START_TAG) {
             continue;
         }
         final String name = parser.getName();
         if (TAG_REQUEST_FOCUS.equals(name)) {
             pendingRequestFocus = true;
             consumeChildElements(parser);
         } else if (TAG_TAG.equals(name)) {
             parseViewTag(parser, parent, attrs);
         } else if (TAG_INCLUDE.equals(name)) {
             if (parser.getDepth() == 0) {
                 throw new InflateException("<include /> cannot be the root element");
             }
             // 解析 include 标签
             parseInclude(parser, context, parent, attrs);
         } else if (TAG_MERGE.equals(name)) {
             // 嵌套中遇到 merge 标签是异常情况
             throw new InflateException("<merge /> must be the root element");
         } else {
             // 相同层级的 view
             final View view = createViewFromTag(parent, name, context, attrs);
             final ViewGroup viewGroup = (ViewGroup) parent;
             final ViewGroup.LayoutParams params = viewGroup.generateLayoutParams(attrs);
             // 递归嵌套生成
             rInflateChildren(parser, view, attrs, true);
             viewGroup.addView(view, params);
         }
     }
     if (pendingRequestFocus) {
         parent.restoreDefaultFocus();
     }
     if (finishInflate) {
         parent.onFinishInflate();
     }
 }
从上面源码阅读中,可能会产生疑惑,AttributeSet 似乎从始至终都是同一个对象啊,但是每次 generateLayoutParams 都是用同一个对象,这似乎每个View生成的 generateLayoutParams 都是同一个东西?那岂不是这些View的属性都是相同的?
首先需要知道获取到的是
parser,只是实现了AttributeSet接口,并没有生成别的东西;public static AttributeSet asAttributeSet(XmlPullParser parser) { return (parser instanceof AttributeSet) ? (AttributeSet) parser : new XmlPullAttributes(parser); }XmlPullParser会不断通过next来走到下一个节点的,对于当前节点,generateLayoutParams以及实例化 View 对象时传递的attr都是在当前节点位置,因此拿到的都是当前节点的属性;
这个读取属性是跟着递归 View 层级一起的,保证解析某个View时拿到的属性也是这个 View 的属性;